Tips for Sewing Your Own Curtains
I. Introduction
A. Creating your own curtains provides both pleasure and numerous benefits for the maker.
Creating your own curtains ranks among the most fulfilling and gratifying DIY projects for home decoration. If you love crafts or desire to customize your living environment, making curtains by yourself presents an exceptional chance to mix artistic expression with functional design. The process goes beyond mere functionality because it allows you to express your personal style through your interior spaces. A simple investment of time and patience enables you to convert a basic room into a customized and cozy sanctuary.


Completing a DIY project gives you joy while displaying handmade curtains across your windows brings about a unique feeling of satisfaction. Every stitch and fold with every detail of your curtains will prove they came from your own hands. New sewing beginners will find this project useful because it teaches fundamental sewing techniques.
B. Making your own curtains allows you to customize your window treatments while saving money.
High-end décor store curtains typically cost a lot more when you want them lined or floor-length or if you’re seeking unique patterns. DIY curtains offer a budget-friendly alternative. Taking advantage of sales on fabric and using leftover pieces or old linens and bedsheets can lead to substantial savings.
The ability to sew your own curtains provides complete control over every detail of your curtain’s design.
Need a curtain with a pattern that complements your furniture?
Do you need a curtain length that stores rarely stock?
Are you searching for blackout lining to use in a nursery or home theater space?
DIY enables you to determine all aspects including fabric weight and opacity as well as hem style and trim.
C. Brief Mention of Basic Skills/Tools Required
You don’t need advanced sewing skills to create your own curtains at home. You only need basic sewing skills such as straight stitching, measuring fabric, cutting materials, and hemming to begin your sewing project.
And the tools required are simple:
To sew your own curtains you’ll need a sewing machine together with fabric scissors, a tape measure and pins as well as an iron and your chosen fabric.
Beginners should not hesitate because this guide details every important tip to help you complete your curtain project with ease and achieve a stunning appearance.
This section explains the key learning points outlined in this guide for readers.
The blog presents eight fundamental tips designed to assist you in sewing your own curtains effectively.
Every tip from fabric choice to proper measuring and correct tool usage along with troubleshooting mistakes helps to increase your sewing abilities and confidence. These tips will guide both beginners and experienced sewers to design curtains that serve their purpose while maintaining beauty.
II. Tip 1: Choose the Right Fabric
Selecting the appropriate fabric represents the most critical decision when sewing your own curtains. Selecting your fabric determines both the appearance and functionality of your curtains in your space. Take a moment to get to know your fabric’s properties before threading your machine so that you can ensure they match your requirements.
A. Choosing the right fabric for your curtains depends heavily on how your room functions.
Different fabrics perform differently when used for making curtains. The ideal fabric choice for living room curtains will not suit bedroom or kitchen settings. Consider the main functions your curtains should serve in your space.
Privacy:
Privacy in bedrooms and bathrooms is best achieved through the use of heavy fabrics such as cotton duck, twill or blackout materials.
Light Control:
Sheer materials allow natural light through while thicker textiles with linings block it.
Insulation:
With their insulation qualities thermal curtains maintain indoor warmth in winter and prevent heat entry during summer. These curtains need either fabric with a tighter weave or a special insulating layer to function properly.
Aesthetic Impact:
When curtains serve mainly as decoration you should value their visual appeal above their functional aspects. You now have the opportunity to use luxurious or lightweight fabrics.
It is crucial to select fabric types that match the purpose of each room. Sheer voile curtains make an excellent choice for creating a romantic atmosphere in a living room but fail to block sunlight effectively in a bedroom.
B. Recommended Fabric Types for Beginners
Beginners sewing curtains will find certain fabrics that simplify the sewing process.
The best beginner-friendly fabrics include:
Cotton:
As the most favored material for sewing projects cotton stands out because it is both simple to handle and available in numerous colors and patterns while draping beautifully. This fabric choice suits every room type.
Linen Blends:
Linen-cotton blends deliver a textured and breathable appearance while maintaining greater stability than pure linen, which tends to wrinkle easily. These fabrics combine style with suitability for both relaxed and rustic environments.
Polyester and Polyester Blends:
These are widely available, affordable, and wrinkle-resistant. Poly blend drapery fabrics create affordable alternatives that resemble luxurious textiles such as silk or velvet.
Canvas or Twill:
Heavier structured fabrics enable designers to achieve bold curtain styles that feature clean lines and a crisp appearance.
Begin your sewing projects with fabrics other than silk, velvet or stretchy knits because these materials are hard to manage on a sewing machine and need more advanced sewing skills.
Learn effective methods for managing tricky materials when sewing slippery or weighty fabrics.
When choosing to work with difficult fabrics or those needed for specific functions you should have proper techniques ready.
Slippery Fabrics (like satin or silk):
Sharp pins and a walking foot on your sewing machine will help you sew slippery fabrics while preventing fabric stretching. You can achieve precise cutting by working on a stable non-slip surface and using weights to hold your fabric in place.
Heavy Fabrics (like velvet or upholstery fabric):
Your sewing machine must possess adequate power to work with heavy fabrics. Choose a larger needle size of 90/14 or 100/16 and proceed with slow stitching. Switching to clips instead of pins can minimize bulk and maintain seam alignment.
Before sewing your main fabric piece always perform stitch tests with scrap material. By making these adjustments you can modify the tension level along with needle and presser foot pressure.
D. Consider Shrinkage, Fade Resistance, and Drape
The true value of fabric quality extends beyond its visual appeal to include its performance over time.
Three factors to keep in mind:
Shrinkage:
Cotton and linen natural fibers typically undergo shrinkage during their initial wash. Begin by washing and ironing fabric before you start cutting. Neglecting to pre-wash your fabric will result in curtains that are too short or become distorted.
Fade Resistance:
Curtains are constantly exposed to sunlight. Select fabrics that come with fade-resistant tags or UV protective treatment for use in areas with direct sunlight exposure. Fabrics containing dark and saturated colors show signs of fading more quickly.
Drape:
Drape refers to how a fabric hangs. Certain fabrics maintain a rigid structure such as canvas but others display soft draping qualities similar to voile or rayon. Select your drape option according to whether you desire structured pleats or flowing elegance.
III. Tip 2: Measure Accurately
Accurate measurement is essential when you sew your own curtains. No matter how beautiful your fabric is or how precise your stitching, it won’t matter if your curtains don’t fit the window properly. Correct measurement sets your project up for achievement even though it may seem less creative than other steps. If you measure correctly then all other steps will proceed with greater ease.
A. Importance of Proper Window Measurement
Why is measuring correctly so important?
Curtains perform dual functions because they serve both decorative purposes and practical needs. The curtains should hang flawlessly without touching the floor unnecessarily or hanging too short or too high from the window frame.
Proper measurements ensure:
The tailored appearance of your curtains should enhance the architectural features of your room.
Proper light management eliminates bothersome light gaps and prevents the formation of awkward shadows.
Functionality—curtains that open and close smoothly.
Material efficiency means you won’t need to purchase more fabric than necessary or have leftover fabric you don’t need.
Many beginners make the mistake of using inaccurate rough estimates or visual measurements. Don’t skip this step. Make sure to use a metal tape measure instead of a cloth one and take detailed written notes of your measurements.
Remember:
measure twice, cut once!
B. The curtain measuring process requires precise calculations of width and length as well as allowances for hems, headers and rod pockets.
When you measure for curtains you need to take into account three essential dimensions.
1. Width
Begin by determining the width of your curtain rod or track from one end to the other instead of measuring your window dimensions. Your curtains will fill this space when they remain closed.
To achieve neat side stacking of curtains when opened extend the rod 4-6 inches past each side of the window.
Your curtain fabric should have a total width that exceeds the rod’s width by a factor of 1.5 to 3 to create fullness and pleating which will be explained further in the next section.
2. Length (Drop)
Determine the curtain’s length by measuring from the rod top to the curtain’s desired endpoint. Your choice of style preference will determine the result.
Sill Length:
Curtains end at the windowsill.
Apron Length:
Curtains hang 4–6 inches below the sill.
Floor Length:
Curtains barely touch or “kiss” the floor.
Puddle Length:
Curtains achieve a sophisticated look by extending 6 to 12 inches past the floor.
When selecting rod pocket or tab-top curtains, take into account that the curtain fabric will cover the rod, which decreases the visible length of the curtain body. Ensure the curtain length includes extra material for hems and headers and rod pockets.
3. Allowances for Hems, Headers, and Rod Pockets
Always add allowances for finishing edges:
Bottom Hem:
The bottom hem generally requires a length between 3 and 6 inches to achieve a polished and substantial appearance.
Top Hem/Header:
Plan for 3–4 inches for basic hems and increase measurements if making rod pockets or header pleats.
Rod Pocket or Tabs:
When making rod pockets you should add more fabric relative to the rod diameter and most designs require 2 to 4 extra inches of fabric that gets folded.
For example:
Your finished curtain length should be 84 inches but to accommodate a 3-inch bottom hem and a 4-inch top hem you need to cut your fabric to a minimum length of 91 inches.
To obtain fullness for your curtains, multiply the measured rod width by 1.5 times for basic gathering or by 2 times for standard fullness.
Curtains that display fullness with gentle waves or gathered pleats appear more attractive even when they remain shut. Curtains that remain flat and stretched create an appearance of being incomplete and inexpensive.
To get the desired fullness multiply the width of your rod measurement by a specific factor.
Multiply your measured rod width by 1.5 times to achieve light gathering fullness for modern or minimal curtain styles.
2x width for standard fullness (most recommended).
Multiply your rod width by 2.5 to 3 times to achieve luxurious curtains with rich fullness for sheer or drapery fabrics.
Example:
To get standard fullness with a 60-inch rod you will require 120 inches of fabric width which equals two 60-inch panels.
To determine fabric needs for pleated styles such as pinch pleats you should measure the width the pleats will occupy when finished and increase this measurement to include additional fabric necessary for pleat construction
(generally 2.5 times the width or more).
D. Double-Checking All Measurements Before Cutting
You cannot reattach fabric after cutting it because the process removes fabric permanently. Professional seamstresses advise double-checking all measurements because once fabric is cut there’s no turning back.
Measure every window individually. Within a single room windows may have different dimensions.
Recheck rod placement.
Did you install the rod at the identical height and width where you took your measurements?
When you choose to add thermal, blackout, or decorative linings to your project, allocate separate measurements and cuts for them.
Before cutting your fabric, use pins or clips to hang it temporarily and confirm that the intended length and width measurements appear correct.
Exercising caution at this stage prevents extensive future frustration.
IV. Tip 3: Pre-Wash and Iron Fabric
You’ve chosen flawless fabric and measured each inch meticulously. But before you cut or sew, there’s another crucial step: pre-washing and ironing your fabric. The majority of DIY curtain makers fail to remember this step which they frequently regret afterwards.
A. Pre-washing your fabric before sewing curtains helps prevent future shrinkage issues.
Cotton, linen and wool blend fabrics typically shrink during their first exposure to water or washing. Your precise measurements and seams will become ruined if you sew curtains from unwashed fabric because they will shorten and distort when you first clean them.
Fabric labeled as “pre-shrunk” can still undergo minor size changes after laundering. Washing your fabric before sewing lets it reach its final size which guarantees your curtains will hang perfectly from the start.
B. Best Practices for Washing Various Fabric Types
Each fabric type needs specific washing methods before sewing begins. Follow these guidelines:
Cotton:
Use mild detergent to wash fabrics in a mach
ine using either warm or cold water cycles. Tumble dry low or air dry. Iron still slightly damp for ease.
while
Linen:
Wash in cold water to reduce shrinkage. To prepare for sewing, linen should be dried by laying flat in the open air or using a low setting in the tumble dryer. Expect considerable wrinkling from linen and prepare to iron it thoroughly.
Polyester/Blends:
Typically polyester blends can be safely washed in cold water through a machine wash cycle though label guidance should be confirmed. Polyester maintains its size during washing but the process helps eliminate manufacturing chemicals and odors.
Silk/Velvet/Specialty Fabrics:
Typically dry clean only. Wash special fabrics only if the manufacturer recommends doing so before the main process. Begin with a small test swatch if you have doubts.
Sheer Fabrics (Voile, Organza):
To protect the fabric from damage wash it by hand or set your machine to a delicate cycle using cold water. Never expose these fabrics to heat during drying because it might cause them to melt or become distorted.
Note:
Before washing the entire fabric piece, perform a test wash on a small fabric sample. Testing with this method allows you to detect any color bleeding issues as well as shrinkage or changes in texture.
Iron your fabric to remove wrinkles which ensures smooth sewing lines.
Follow the pre-washing step with thorough ironing before cutting your fabric. Eliminating wrinkles is essential because they can make your measuring and cutting lines inaccurate. Wrinkles in fabric can cause measurements to appear incorrect because they alter the fabric’s length appearance.
Tips for ironing:
It is important to select the appropriate heat setting for your fabric type by checking the labels or seeking advice from fabric store experts.
Utilize steam to eliminate tough wrinkles but prevent excessive moisture from contacting delicate materials.
To maintain the appearance of delicate or dark fabrics, iron them from the backside to prevent shiny marks.
Achieve optimal results when ironing linen or heavy cotton fabrics by applying heat to them when they are slightly damp.
Omitting ironing will lead to twisted seams and uneven hems while causing curtains to hang incorrectly. This simple step guarantees professional-looking results.
D. When to Skip Pre-Washing (Specialty Fabrics)
Specialty fabrics should not be pre-washed due to the risk of damage. These include:
Silk, velvet, faux suede, and brocade:
These materials risk losing their sheen and texture along with their original shape once they go through the wash. Dry cleaning is usually preferred.
Blackout or thermal fabrics:
The special coatings on blackout and thermal fabrics may become damaged during washing. Follow manufacturer care instructions instead.
Embellished or embroidered fabrics:
Machine washing can damage embellishments such as beads, sequins and metallic threads on fabrics.
V. Tip 4: Use the Right Tools and Equipment
The proper tools hold equal significance to both selecting appropriate fabric and accurate measurements in the process of sewing your own curtains. Using correct equipment will make your project simpler and quicker while delivering superior finishes. Both beginner curtain sewers and experienced DIY enthusiasts will find that quality tools mark the distinction between feeling frustrated and achieving satisfaction.
A. Sewing Machine Type (Basic vs. Heavy-Duty)
Your sewing machine functions as the most crucial tool in your curtain-making equipment. Choosing the right machine makes a substantial difference in both your sewing experience and final product quality.
1. Basic Sewing Machines
A standard domestic sewing machine should be adequate for sewing light- to medium-weight materials including cotton polyester and linen blends. These machines provide essential stitch options like straight and zigzag stitches which make them ideal for basic curtain construction.
Look for features like:
Adjustable stitch length
Reverse stitching
Built-in needle threader
Drop-in bobbin system
Beginners will find these affordable machines versatile enough for their needs.
2. Heavy-Duty Sewing Machines
When sewing heavy fabrics such as velvet, chenille, denim or layered blackout curtains you should use a heavy-duty sewing machine.
These machines have:
Stronger motors
Durable metal parts
Higher piercing power for multiple layers
Heavy-duty sewing machines handle dense seams along with thicker hems and specialty fabrics without difficulty. Heavy-duty sewing machines become essential when you sew often or handle complicated patterns.
B. Essential Tools:
Essential sewing tools for this project include Fabric Scissors, Pins, Measuring Tape, an Iron, and a Seam Ripper.
To sew curtains successfully DIYers need to keep specific essential tools available.
1. Fabric Scissors
Using specialized fabric scissors is essential because they provide better cutting results compared to general-purpose scissors. These scissors enable precise fabric cutting for accurate results. Fabric scissors should remain sharp and dedicated solely to cutting fabric because paper cutting will dull the blades rapidly.
2. Pins and Clips
Straight pins secure hems, seams and pleats together until you finish your stitching work. Ball-head pins simplify handling but use fabric clips to secure delicate fabrics since pins might create holes.
3. Measuring Tape
A flexible measuring tape serves a crucial role throughout the layout and construction process by allowing you to obtain accurate dimensions. The tape should be at least 120 inches long to cover the entire length of floor-length curtains.
4. Iron and Ironing Board
Ironing is often overlooked but is crucial. When you press seams along with hems and pleats you simplify the sewing process while giving your work a polished look.
5. Seam Ripper
Even experienced sewers make mistakes. A seam ripper lets you remove stitches without harming the fabric which proves crucial when you need to modify hems or correct misaligned seams.
C. Optional Helpful Tools:
Rotary Cutter, Cutting Mat, Fabric Weights
These tools are optional but improve your work speed and accuracy when handling large fabric pieces.
1. Rotary Cutter
The rotary cutter’s circular blade allows you to cut multiple fabric layers with long straight lines efficiently. A rotary cutter works more quickly and delivers better accuracy than scissors when combined with a cutting mat.
2. Cutting Mat
A self-healing cutting mat safeguards your surfaces while its measurement grids enable precise fabric alignment and cutting.
3. Fabric Weights
Fabric weights secure your material during cutting instead of using pins. The use of fabric weights proves useful for delicate or slippery fabrics because pins can cause distortion.
D. Importance of Maintaining Sharp Tools
Your project will suffer when you use dull tools.
They cause:
Frayed edges
Inaccurate cuts
Strained hands
Slower progress
You should ensure your scissors and rotary cutters remain sharp through proper maintenance.
Reserving them for fabric only
Sharpening them regularly
Storing them properly
Regular cleaning and recommended oiling of your sewing machine will maintain its performance. The accumulation of lint on your sewing machine can result in poor stitching quality while potentially harming the motor after prolonged periods. Change your sewing machine needles every 6-8 hours of usage or quicker if skipping stitches or thread breaks occur.
VI. Tip 5: Plan Your Curtain Design Carefully
When you sew your own curtains you gain total control over how they look. But with that freedom comes responsibility. Diving into curtain creation without planning may result in incompatible hardware choices while creating uneven hem lines and fabric waste. Designing your curtains in advance helps you prevent expensive errors while achieving an attractive and unified appearance.
A. Decide on Style:
Rod Pocket, Grommet, Tab Top, Pleated
The choice of curtain style determines your window aesthetics and dictates fabric performance together with material requirements and sewing techniques at the top.
1. Rod Pocket
The rod pocket style requires making a tube on the curtain panel top so the rod can pass through. Rod pocket curtains work best in informal spaces with sheer drapes yet restrict window opening and closing functionality.
Pros:
Easy to sew, no hardware needed.
Cons:
The rod pocket style fails to slide smoothly on the rod and often appears bunched up.
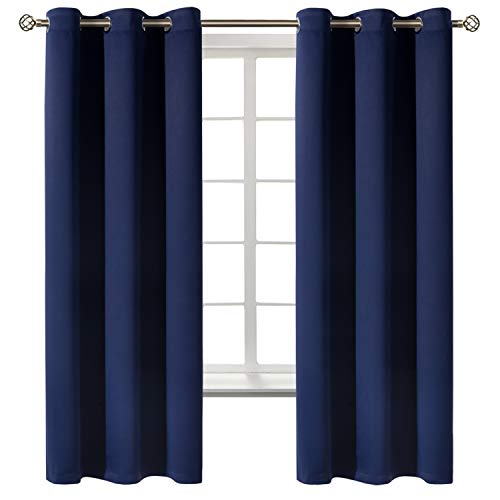
2. Grommet (Eyelet)
The curtain design features metal or plastic grommets placed into holes at the top that help the curtain glide effortlessly along the rod.
Pros:
Modern look, easy to open/close.
Cons:
You need either a grommet tool or pre-made kits to install but your options for top fabric designs become restricted.
3. Tab Top or Tie Top
Ties made from fabric are stitched into the top seam and extend over the curtain rod. These curtains create a laid-back handmade look that fits nicely in boho, country, or children’s rooms.
Pros:
Decorative, DIY-friendly.
Cons:
These types of curtains will develop a droopy appearance over time which makes them unsuitable for spaces with regular movement.
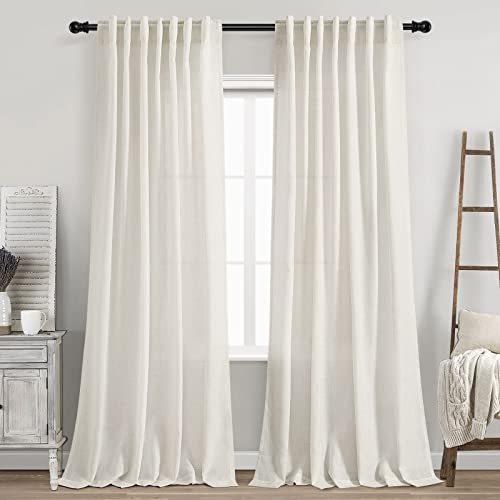
4. Pleated (Pinch, Box, Goblet)
Classic tailored curtains need pleated headers sewn into their tops and typically use hooks or rings for hanging.
Pros:
Elegant, formal look.
Cons:
The sewing process is more difficult for these curtains which need additional fabric and structural support.
Tip:
Select curtain styles according to how the room will be used together with your desired level of formality and sewing expertise.
B. Consider Lining for Light Control and Insulation
While lining is not essential it represents an important aspect of curtain design.
It can:
Select lining options that block light to create better sleeping environments or protect media viewing areas.
Insulation in your drapes provides protection against temperature extremes.
Provide privacy in bathrooms or bedrooms.
Give your curtains added drape and fullness.
Shield your main fabric material from sunlight damage to prevent fading.
Common lining options include:
Cotton Lining:
Soft, breathable, good for casual curtains.
Blackout Lining:
Blocks nearly all light, great for bedrooms.
Thermal Lining:
Offers insulation against temperature changes.
Interlining:
The interlining provides softness between the curtain fabric and its lining to create volume.
The added weight and bulk from lining require careful consideration for both hardware choices and sewing methods.
Draw your design plan before beginning your project
Your sewing and cutting tasks become easier when you first visualize your design.
Sketch it on paper:
Determine curtain dimensions alongside style selection and choose appropriate rod type while establishing trim placement and pleat spacing.
Create a mock panel:
Sew a small test piece with scrap fabric to evaluate how your selected curtain style behaves when hung.
Use digital tools:
Digital tools like apps and room planners enable users to visualize different curtain styles on their windows.
This additional step minimizes unexpected issues while providing a construction reference.
Include additional fabric in your budget to accommodate special design elements such as ruffles and trims.
To transform your curtains from ordinary panels consider adding more fabric and budget for these decorative elements:
Ruffles:
Add texture and femininity—requires additional fabric length.
Trim and Fringe:
Decorative borders enhance the aesthetic.
Contrast Bands or Color Blocks:
Visually break up long panels.
Valances:
To create a more formal appearance, install a top layer as a valance.
VII. Tip 6: Follow Basic Sewing Techniques
Your fabric’s beauty and your precise measurements won’t matter if your sewing technique isn’t up to the mark because your project’s success depends heavily on how you sew. Proper sewing technique produces curtains that last longer while maintaining professional quality and hanging smoothly. Fortunately, curtain-making doesn’t require complicated stitching methods. Mastering just some essential sewing abilities allows you to create long-lasting beautiful curtains.
A. Simple Straight Stitching Techniques
Straight stitching serves as the basic sewing technique for both beginners and experienced DIYers when creating curtains. Curtains require basic sewing because they consist of long straight lines of fabric without any complex curves or advanced garment shaping which makes them a perfect project to master fundamental sewing skills.
1. The Straight Stitch
The straight stitch holds the title of being both the most frequent and significant stitching method used in curtain-making.
To execute it properly:
Correctly threading the machine will ensure proper tension settings.
Most curtain fabrics require a stitch length set between 2.5mm and 3mm.
Maintain a consistent speed throughout and feed the fabric steadily without applying any extra force.
2. Backstitching
Start and finish each seam with a backstitch (reverse stitch) of 2-3 stitches to secure your work. This technique keeps your stitches secure from coming undone during regular use and laundry.
3. Test First
Before you begin sewing your actual panels, test your settings using a scrap piece of the fabric. The initial fabric scrap test allows you to confirm your stitching tension and length settings match perfectly with the thread color you selected.
B. Creating Hems:
Single, Double-Fold Hems Explained
Hemming stands out as the most noticeable aspect of making curtains. A properly constructed hem provides curtains with a refined appearance while stopping the fabric edges from fraying. DIY curtain-making features two popular hem styles known as single-fold and double-fold hems.
1. Single-Fold Hem
Create a single hem by turning the fabric edge inward to form a 1-inch fold and then press it with an iron.
Stitch along the raw edge to secure.
This hemming technique works best with materials that resist fraying and for sheer fabrics.
2. Double-Fold Hem
First fold the raw edge by ½ inch and press it before folding the fabric again by 3–4 inches to match the design requirements.
The technique completely hides raw edges while stopping fraying and adds weight to the bottom hem which allows curtains to hang better.
Choose this method if you are working with heavy materials or if you desire a polished professional finish.
3. Bottom and Side Hems
The bottom hem depth usually ranges from three to four inches to provide additional weight.
Side hems maintain a narrow width of 1-2 inches for neat curtain edges.
The sewing process requires thorough pressing of hems to guarantee sharp and clean folds.
C. Create Even Seams and Corners with Top Stitching
The final appearance of curtains receives significant improvement from well-executed seams and sharp corners. Large flat curtain panels show noticeable puckering and misalignment when slight unevenness occurs.
1. Straight Seams
The sewing machine’s throat plate seam guide markings help maintain uniform seam allowances.
Standard seam allowances range from ½ inch up to 1 inch.
2. Perfect Corners
When creating corners at the hem you should cut away extra fabric inside the fold in an angled manner. Trimming fabric at the corners removes extra material to make sharp edges.
After sewing use a blunt instrument such as a chopstick to carefully shape corners into smooth points.
3. Topstitching
Applying topstitching along the edges of hems or pleats creates an attractive and professional look.
Adjust the needle position to stitch between 1/8 and ¼ inch from the fabric edge.
Maintain a straight stitch path for optimal results.
Proper pinning or clipping helps maintain fabric layer alignment during sewing which prevents fabric shifting and puckering particularly in large curtain panels.
To maintain proper alignment of fabric layers during sewing you must use proper pinning or clipping techniques. Proper pinning or clipping maintains fabric alignment throughout the sewing process to prevent shifting and puckering which often occurs with large curtain panels.
1. Pins
Insert pins at right angles to the seam line to facilitate quick removal during sewing.
Use glass-head pins that can withstand ironing.
Maintain smooth hems and seams by pinning fabric with a 4-6 inch spacing.
2. Clips
Select fabric clips over pins when working with delicate or thick materials to prevent holes and fabric distortion.
Heavy materials such as velvet and multi-layer blackout curtains respond well to the use of clips.
3. General Tips
Remove pins or clips from your sewing path during the sewing process to protect your machine’s needle.
Ensure you do not stretch or distort the fabric while you handle the pins.
VIII. Tip 7: Finish with Care
A professional finish gives homemade curtains an upscale store-bought appearance. The curtain’s lifespan and appearance depend on the finishing details that influence its durability and style. Invest time in the final stage of your work to make certain your hard work shows beautifully.
A. Pressing Seams for a Professional Finish
The pressing phase stands as the least appreciated yet vital element in the sewing process. When your seam is well-pressed it remains flat and maintains its structure to achieve a sharp and professional curtain appearance.
1. Press Every Step
Complete each construction phase by pressing the seams including hems, side seams, pleats and top headers.
Select the steam setting when pressing cotton and linen materials.
Use a pressing cloth when pressing delicate fabrics to prevent shine and scorch marks.
2. Final Press
After sewing completes the curtain panel perform a thorough final press on the entire piece.
Ensure that folds and hems are crisp.
The shape of the curtain becomes fixed when you hang it immediately following pressing.
B. Adding Trims, Tassels, or Decorative Edges
You can personalize or improve your curtains by adding decorative elements during the finishing stage.
1. Trims and Fringe
Apply trims or fringe to the bottom edge or sides to enhance the curtain’s appearance.
Either fabric glue or precise machine stitching will secure these elements in place.
Choose trims which will enhance your fabric choice by matching its weight and style.
2. Tassels
Tassels bring sophistication to formal areas such as dining rooms and living spaces.
Install tassels by hanging them from tiebacks or attach them at the curtain corners.
3. Decorative Edges (Piping, Braids)
By stitching a contrasting fabric or braid to the edge of the curtain you achieve a professional designer look.
Carefully apply the material to keep the curtain edges smooth and prevent any puckering or stretching.
The curtain must be evaluated for its length and drape before completing the final stitching.
You need to hang the curtain temporarily before finishing your last stitch to examine its fall.
1. Evaluate Drape and Length
Verify that the length of both panels matches.
Ensure that hems are level and straight.
When hem adjustments are necessary, secure the hem with pins before pressing it again and sewing anew.
2. Check for Uneven Gather or Pleats
Ensure that the pleats on sewn curtains remain evenly distributed and display a natural fall.
Adjust header tape or hooks if necessary.
3. Adjust for Puddling or Pooling
Extra length allows formal curtains to puddle on the ground for a sophisticated appearance.
In casual or functional rooms, curtains should float about an inch above the floor surface.
Make certain every thread on the curtain is clipped and the fabric remains clean.
Although it may appear to be a minor task, the final cleanup significantly enhances the appearance and longevity of your curtains.
1. Clip Loose Threads
Look through both sides of the curtain to identify any loose or dangling threads.
Employ sharp embroidery scissors to cut threads near fabric while avoiding damage to stitches.
2. Inspect Stitching Lines
Carefully examine your stitching to identify skipped or broken stitches and fix these problems as necessary.
Review all hem and header edges for missed sections.
3. Final Quality Control
Position the curtain flat on a surface and carefully examine all seams, hems, and trims.
Verify that all decorative elements remain fastened securely and correctly positioned.
Before hanging, remove any pressing marks or wrinkles by shaking out or lightly steaming the curtain.
IX. Tip 8: Troubleshoot Common DIY Curtain Mistakes
DIY curtain projects often encounter unexpected difficulties despite thorough preparation and dedicated effort. Don’t give up—most sewing errors have quick solutions which will help improve your sewing technique and produce superior curtains.
A. Fabric Puckering (Causes and Fixes)
The gathering or rippling of fabric along seams results in puckering which often troubles DIYers yet the problems leading to it are both easy to identify and avoid.
1. Causes of Puckering:
Incorrect Machine Tension:
One of the biggest culprits. Excessive tension on either the upper or lower thread leads to puckering of the fabric along the stitched line.
Needle Type/Size Mismatch:
Puckering may occur when you choose the wrong needle for your fabric like using a universal needle on lightweight sheers which causes fabric pulling.
Fabric Feed Issues:
When the fabric does not feed evenly because of incorrect pressure on the presser foot or rough handling it may create uneven stitches along with puckering.
Thread Type:
Cheap polyester threads are known to make seams retract and develop puckering during stitching.
2. How to Fix It:
Adjust Tension Settings:
Run tests with various tension adjustments on practice fabric until you achieve flat and even stitches.
Use the Right Needle:
Ensure you select the appropriate needle type (universal, ballpoint, sharp) and its size based on the weight of your fabric.
Feed Fabric Gently:
Don’t push or pull as you sew. Let the machine guide the fabric evenly.
Consider Interfacing or Stabilizers:
To prevent distortion lightweight interfacing should be applied to particularly thin or stretchy fabrics.
Switch Thread Types:
Choose a thread made of high-quality polyester or cotton wrapped material that matches the type of fabric being used.
B. Uneven Hems or Lengths
Uneven curtain hems or panels with slight length discrepancies stand out as some of the most frustrating mistakes because they cause curtains to hang crookedly.
1. Causes of Uneven Length:
Inaccurate measurement and cutting remains the primary reason for uneven curtain lengths. Failing to double-check measurements leads to curtain panels of different lengths.
Fabric Shift During Sewing:
When fabric lacks proper pinning one layer can move which results in uneven hems.
Stretching the Fabric:
The action of pulling on fabric while sewing can unintentionally stretch and extend the panel.
Not Pre-Washing:
Cotton and linen fabrics typically experience shrinkage once washed.
2. How to Fix or Prevent:
Measure Twice, Cut Once:
Measure fabric dimensions twice before making any cuts to ensure accuracy.
Hang Before Final Hemming:
Temporarily hang your curtains to evaluate their length and fall before you sew the permanent hem.
Pin Securely:
Position pins or clips every 4-6 inches along hems to ensure fabric alignment.
Re-hem as Needed:
When a panel turns out longer than others, either modify the bottom hem to even them or precisely trim the excess and re-hem.
C. Machine Tension Issues
Improper machine tension can damage seams by producing puckering or uneven and untidy stitches.
1. Symptoms of Incorrect Tension:
Loops on Underside:
Upper thread tension is too loose.
Fabric Gathering or Puckering:
Upper thread tension too tight.
Unbalanced Stitches:
There is improper synchronization between the bobbin tension and the top thread tension.
2. How to Correct:
Upper Thread Tension:
Adjust dial slowly and test on scraps.
Bobbin Tension:
The bobbin tension should remain unchanged unless upper tension adjustments fail to solve the issue.
Rethread the Machine:
If ongoing problems occur always check and rethread both the upper thread and bobbin because mis-threading errors happen often yet remain unnoticed.
Check Needle and Fabric:
Old needles and incorrect fabric/needle combinations disrupt tension settings.
D. Dealing with Stretching or Shrinking Fabric
Natural fiber fabrics such as cotton and linen exhibit shrinkage when washed while other materials like knits and specific sheers expand when handled or hung.
1. Prevent Shrinking:
Pre-Wash Fabric:
The fabric should be pre-washed and dried following the same procedures you will use to maintain the final curtains.
Dry Thoroughly:
Complete drying of fabric before cutting or sewing will allow full shrinkage to occur.
2. Handling Stretchy Fabric:
Use Interfacing or Stay Tape:
Prevents edges from stretching out.
Pin Generously:
Secure layers to prevent distortion.
Avoid Pulling:
Guide the fabric by allowing the feed dogs to move it while resisting any pulling movements.
Check Hanging Behavior:
Under their own weight some light fabrics tend to experience slight stretching. Allow for this when measuring and hemming.
X. Bonus Tips
DIY curtain-making becomes more enjoyable and budget-friendly through creative methods which also allow for personalized touches beyond technical sewing abilities. These additional suggestions will help you take your curtain projects to the next level while streamlining the process.
A. Trying Simple No-Sew Options for Beginners
A sewing machine isn’t something everyone possesses while some people lack the necessary time or confidence to begin sewing. No-sew curtains represent an easy way to create beautiful, functional window treatments.
1. Iron-On Hemming Tape:
Fabric stores stock this tape which enables hot iron bonding of fabric edges.
Perfect for hemming simple panels.
2. Fabric Glue:
High-quality fabric glue works best for securing trims and finishing hems.
This product offers strong and machine-washable results that work well with fabrics that range from light to medium weight.
3. Clip-On Curtain Rings:
Measure fabric panels to the desired dimensions before connecting them to rings using clips which eliminates the need for hemming.
Great for casual or rustic styles.
4. Fusible Webbing:
Fusible webbing merges fabric layers to create hems or headers.
This product provides user-friendly operation along with precise edges that require no sewing.
B. Upcycling Old Fabric or Bed Sheets
Upcycling serves as a beneficial solution for creative individuals who prioritize sustainability and economy.
1. Old Bed Sheets:
Curtain-making benefits from the wide widths of durable cotton sheets and blended fabrics.
Flat sheets work well as large curtain panels or valances and are suitable for café curtains.
2. Tablecloths or Vintage Linens:
Vintage linens serve as charming additions to kitchen and bathroom spaces.
Short curtains or kitchen sink skirts can be created from tablecloths.
3. Clothing Fabric:
Large fabric sections from dresses, skirts and saris make excellent materials for crafting patchwork or Boho style curtains.
4. Benefits:
Cost-effective, environmentally friendly, and unique.
The product features unique patterns and textures which standard curtain fabrics do not provide.
C. Personalizing with Embroidery or Fabric Paint
DIY curtains provide an ideal surface for implementing custom design elements.
1. Embroidery:
Both hand and machine embroidery techniques enhance borders, corners and patterns.
Plain fabrics receive enhanced texture and individualized design elements through this technique.
2. Fabric Paint:
Patterns and designs including geometric shapes and botanical elements can be achieved using both stencils and free-hand painting techniques.
Glitter or metallic fabric paints deliver a soft shimmering finish.
3. Iron-On Transfers:
Transfer printed designs onto fabric using iron-on transfer paper to create unique personal motifs.
4. Appliqué:
Create patterns or thematic designs on your curtain panels by attaching fabric shapes through sewing or gluing
these shapes can represent flowers, animals or abstract forms).
D. Joining Online Sewing Communities for Help
Joining an online crafting or sewing community benefits everyone regardless of their experience level.
1. Benefits of Sewing Communities:
Advice and Troubleshooting:
Receive immediate assistance for tension issues and hemming questions.
Inspiration:
Explore project photos along with imaginative curtain designs and various fabric combinations.
Patterns and Tutorials:
Discover free resources that provide DIY curtain designs together with sewing techniques.
Moral Support:
Encouragement from fellow DIYers keeps you motivated.
2. Recommended Platforms:
Reddit (r/sewing):
Helpful, beginner-friendly community.
Facebook Groups:
Search for Facebook groups such as “Sewing for the Home” and “DIY Curtains and Drapes.”
Instagram and Pinterest:
Instagram and Pinterest serve as excellent sources for finding both curtain-making tutorials and inspiration boards.
YouTube Channels:
There are many available tutorials covering both basic and advanced techniques for sewing curtains.
3. Sharing Your Work:
Share pictures of your finished curtains to receive feedback and praise.
Engage in sewing challenges or theme-based projects.